6.7. Setting up a Web Server
The goal of this section is to teach the reader how to configure web services on EnGarde Secure Linux. EnGarde Secure Linux supports two types of mail servers: normal and secure. Secure web servers have their content protected with encryption via SSL (Secure Sockets Layer).
By the end of this section the reader will have properly configured both a normal and a secure web server on their EnGarde Linux machine and will be in a position where they can begin to upload content via FTP (File Transfer Protocol) or SCP (Secure Copy Protocol).
6.7.1. DNS Setup
Begin by creating a new domain using the procedure outlined in the previous section, "Setting up a Forward DNS Zone". Once you have your forward zone created you need to do the following:
Create a new Address record for "www.<yourdomain>", pointing www.<yourdomain> to the IP address of your EnGarde Secure Linux machine.
For example, if your domain name is engardelinux.org you would enter the following:
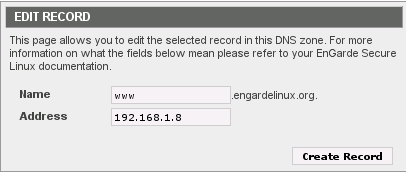
This tells the Internet what IP address the machine www.engardelinux.org may be found at.
6.7.2. Configure a Normal Web Server
Log into the Guardian Digital WebTool, click the Services menu, choose the World Wide Web Management link, then choose the Create New Virtual Host option from the Modules menu and you'll be presented with a screen like the one in Figure 6-15.

Fill out the information on this page using the suggestions below:
Hostname
Enter the name of this website, including the standard "www." prefix.
Use SSL
Leave this set to No.
Address
Enter the IP address of this website or select one by clicking the ... button. This should correspond to the IP address you entered in the DNS record at the beginning of this section.
Admin Email
Enter an administrative e-mail address for this site.
Webmaster
Enter or select a local user who will have read/write access to this site. This should be the primary account used for managing content.
Group
Enter or select a group which will have read/write access to this site. Any user who is a member of this group will have read/write access to the site.
Database Settings (Optional)
This section allows you to optionally create a database for use with this website. If you want to do this select Yes next to Create Database? and enter a database Username and Password in the boxes provided. The database name will be the Hostname with the periods changed to underscores, ie www_engardelinux_org.
When done, click the Create New Virtual Host button at the bottom of the screen. The Guardian Digital WebTool will set up your website and you will be returned to the main Webserver Management screen. Click the Restart Apache Web Server Service button to activate your changes.
After this you are all done! If DNS is properly configured you should be able to access your website and you should receive a HTTP 403 error page until you upload content.
6.7.3. Configure a Secure Web Server
Log into the Guardian Digital WebTool, click the Services menu, choose the World Wide Web Management link, then choose the Create New Virtual Host option from the Modules menu and you'll be presented with a screen like the one in Figure 6-16.

Fill out the information on this page using the suggestions below:
Hostname
Enter the name of this website, including the standard "www." prefix.
Use SSL
Change this to Yes.
Address
Enter the IP address of this website or select one by clicking the ... button. This should correspond to the IP address you entered in the DNS record at the beginning of this section.
Admin Email
Enter an administrative e-mail address for this site.
Webmaster
Enter or select a local user who will have read/write access to this site. This should be the primary account used for managing content.
Group
Enter or select a group which will have read/write access to this site. Any user who is a member of this group will have read/write access to the site.
Database Settings (Optional)
This section allows you to optionally create a database for use with this website. If you want to do this select Yes next to Create Database? and enter a database Username and Password in the boxes provided. The database name will be the Hostname with the periods changed to underscores, ie www_engardelinux_org.
Before you can use this new Secure Virtual Host you need to create an SSL certificate and key. From the main Virtual Host Management screen you will see a screen like the one in Figure 6-17.

Click the virtual server you just created, which is prefixed by https://, scroll down to the SSL Certificate Management section, and click the Create New Certificate button. You will be presented with a popup like the one in Figure 6-18.

Fill out the information on this page using the suggestions below:
Authority Name
Enter the name of your site, including the standard "www." prefix.
E-Mail Address
Enter an administrative e-mail address where you may be reached by people who need to contact you regarding your certificate.
Organization
Enter the name of your company or organization.
Department (Optional)
Enter the name of your department or corporate subdivision. This field is optional.
City
Enter the city where your organization resides.
State or Province
Enter the state or province where your organization resides.
Country
Enter the two-letter country code where your organization resides.
When done, click the Create Certificate button at the bottom of the screen then navigate back to the main Webserver Management screen. Click the Restart Apache Web Server Service button to activate your changes.
After this you are all done! If DNS is properly configured you should be able to access your website and you should receive a HTTP 403 error page until you upload content.