Amigo Linux Printing How-To:
Installing the software for printing: PDQ
In this section, you will accomplish three things:
- determining and obtaining the correct driver for your printer,
- installing Ghostscript as the filter software,
- setting up your printer using pdq.
All printing in Linux is postscript-based. That is, a file generally needs to be in postscript format in order to be printed. Ghostscript is the program that does the magic of translating your postscript file, so that your non-postscript printer can print it. pdq defines your printer resources, including options in the printer driver, and sends your file to Ghostscript.
In the course of trying to set up printing, I have also played around with the lpr and lprng spoolers. In fact, lpr used to be the default for Linux for a long time time. However, I was unable to get them to work. It seems that setting up permissions properly is rather tricky. On the other hand, working with pdq proved to be straightforward.
1. Getting your printer driver
Linux has evolved to the point where a large number of printers are supported, especially non-postscript printers. In order to find out which driver to use with your printer, go to http://www.linuxprinting.org/printer_list.cgi. There you will also find information on whether you need to download this driver separately or whether it is included in Ghostscript. Most likely it is already part of Ghostscript, since the current release of Ghostscript contains drivers for many Canon, Epson, and HP inkjet printers, as well as for PCL-type and postscript laser printers. You may also be interested in seeing the entire list of drivers.
2. Obtaining and installing Ghostscript
You will need to download and install the following files from Slackware:
/ap/espgs-7.07.1-i486-2.tgz
/ap/gnu-gs-fonts-6.0-noarch-1.tgz
/xap/gv-3.5.8-i386-1.tgz
/ap/gimp-print-4.2.5-i386-1.tgz
/l/xaw3d-1.5-i386-3.tgz
espgs is the Ghostscript program, gnu-gs-fonts has the fonts that Ghostscript uses, and gv is a viewer to display postscript files in X. gimp-print is required by Ghostscript to work properly, and xaw3d is required by gv. The last two files are from Slackware 9.1, which I usually go to when I need extra files, since Amigo is based on Slackware 9.1. The first three files are from Slackware 10.
Having installed these files, you should test your installation by opening one of the sample ps files in the /usr/share/ghostscript/7.07/examples directory with gv, in order to make sure you can view postscript files.
3. Obtaining and installing pdq
As I mentioned earlier, pdq ist the software that plays the role of the spooler in our installation of printing in Amigo Linux. It is described in detail on the pdq website.
Unfortunately, the pdq program file for downloading from that website is a source file, and I decided at the outset, when learning about Linux, that I would try to avoid compiling programs whenever possible. Fortunately, I was able to locate a file with compiled binaries in a French Linux distribution called TcLinux: http://www.larochelle-innovation.com/tclinux/tclinux11/req/pdq-2.2.2.tgz
Download and install that file.
The file from TcLinux installs all necessary program files, in particular the two binaries pdq and xpdq, but it does not contain any drivers. For these you want to download the file
pdq-resources-2.2.1.tgz
from the pdq web site. Expand this file into a temporary directory, and then copy all subdirectories under /etc/drivers in that temporary directory to /etc/pdq/drivers. (The /etc/pdq/drivers directory was created as part of your installing the TcLinux file above). At this point you should be able to see the following directories on your system:
These contain a variety of printer drivers, some of which you will use in the next step./etc/pdq/drivers/generic /etc/pdq/drivers/ghostscript /etc/pdq/drivers/misc /etc/pdq/drivers/TcLinux
4. Setting up your printer with xpdq
The binary that acts as a sort of spooler is pdq, whereas xpdq is an X interface for pdq. Both these files are in the usual place, /usr/bin/. The main job in setting up pqd is to choose the proper driver and to write the printer resource file printrc, located in the /etc/pdq directory, which will tell pdq how to print.
To proceed further, run xpdq. You will see the following interface:
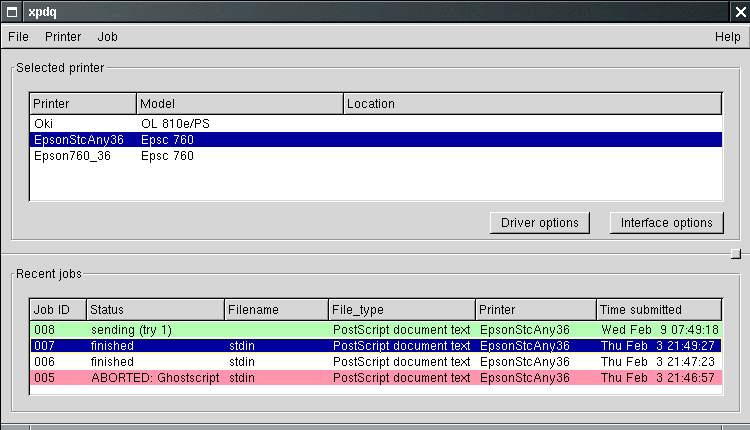
The top panel in the picture shows my installed printers, and the bottom panel some previous printing jobs including one just sent to the printer. In your installation, leave any entries on top alone for the time being. They are default entries and insure that you are starting with a printrc file that has the proper format. Once you have installed your own printers, you can delete the initial entries.
Now, click on "Printer" on top and install your own printer. It is a simple, step-by-step process, and you will be prompted for the necessary information along the way. You will also be asked at one point about the interface, for which you will pick "local" (meaning the parallel port on your computer). You will find that for a large number of Epson, Canon, and HP inkjet printers, the driver to use is a Ghostscript driver called uniprint. This a universal driver, which gets customized for your specific printer by clicking on the "Driver option" button in xpdq. If you have an Epson printer, I suggest you choose the last item, Nr. 41, on the list of driver options. This is a generic driver that works very well for most Epson printers.
5. Testing your installation
At this point, you are ready to see whether you can print in Amigo. Before you do anything else, run xpdq if it is not running already. Then locate a suitable postscript test file, preferably one with formatted text, e.g. alphabet.ps in /usr/share/ghostscript/7.07/examples, and in a terminal window at the command line do
Now watch the bottom panel of xpdq, where the progress of your printing job will be shown, and in just a few seconds a beautifully printed postscript file will come out of your printer.pdq /path/testfile.ps
You can also print from xpdq, by clicking on "File", then "Print file", and browsing for the file in question.
© C. Steinbrüchel (2005)